



BONUS: Mastering your track & uploading to Soundcloud

With
John WatsonJohn Watson gives your finished track a rough master in Ableton Live, then uploads it to SoundCloud.
What's in the course
14 lessons (2h 26m) · 2 free
01. Getting started & setup
3:21
02. Managing a sample library
Free lesson4:34
03. Ableton preferences
1:14
04. Using samples: Simpler and Sampler devices
7:04
05. Using samples in your track (trim, stretch, tune, EQ)
12:56
06. Adding sampled strings and flutes
7:28
07. Adding sampled rhythm: kicks and snares
25:07
08. Sampling external intsruments - drum machine & synth
12:28
09. Building the parts in Session view
13:55
10. Recording the song into Arrange view
4:34
11. Fine tuning track structure
5:35
12. Mixing the track: effects
21:24
13. Final adjustments
13:14
14. BONUS: Mastering your track & uploading to Soundcloud
You are here13:31
Lesson transcript
Mixing and Mastering Process
Okay, so welcome back! I'm happy with the mix now, and I think it's time to commit to mixing it down and giving it a rough master.
Finding the Right Section
First off, I'm coming to the busiest section in the track. Having created this myself, I know that it's going to be this section here. Visually, I can tell there's the most amount of things happening, so this is going to be the densest part and thus the loudest part of the track.
I'm going to loop this section up, and the first thing I want to look at is the master output:
- Current Level: -4 dB below zero
- Headroom: Fair amount present
At this stage, I don't want to see levels really high or experiencing digital clipping. Throughout the mixing process, I've kept the volume levels low because the mastering will make everything sound louder, polish the track, and enhance professionalism.
Using the EQ8
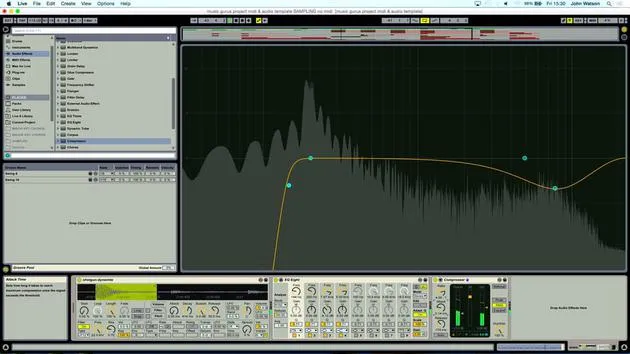
Let's go to this section and load up the EQ8. This is essentially a rough mastering session, good enough for SoundCloud, social media, and playing in bars and clubs.
-
Engage Oversampling: This allows for precise frequency analysis.
-
Frequency Content Overview:
- Low frequency energy is down low.
- Highs are up top.
-
Low Cut Filter:
- Cuts off frequencies below 30 Hz to avoid unwanted sub-frequencies that can sound muddy when played loudly.
-
Adjusting Bell Curve:
- Set a bell curve and tighten the Q.
- Raise the gain level and sweep through to find problem areas.
- Scale adjustment to 200% reveals a resonant area.
- Drop back to 100% and widen the Q to manage the ringy frequencies.
-
Boosting Mid-range Frequency:
- Add a little more mid-range frequency and widen the Q to brighten up the track.
Adding Compression
Now, let's bring up a compressor. I'll use the glue compressor, which works well on buses and mix-downs.
-
Set Ratio:
- Keep it low at 2 for gentle processing.
-
Adjust Release and Attack Times:
- Set release time fairly fast.
- Fast attack to compress a little of the music, but not heavy-handed.
-
Second EQ Stage:
- Add a second EQ after the compression, now in mid-sides mode, to sort stereo information.
Mid-Sides EQ Adjustment
-
Monitor Mono and Stereo:
- Focus on removing low frequency stereo information.
- Apply a low cut at about 140-150 Hz.
-
Adjust High Frequency Mono Information:
- Calm and dip the mono information in the high frequency end.
- Add a bit of air in the stereo (left and right sides).
This helps the track's overall perception when played out, giving control over low frequency energy.
Employing the Limiter
The next stage is using the limiter to reduce the dynamic range of the track and to amplify the overall volume.
-
Set Ceiling:
- Around -0.09 dB, ensuring we don't exceed a certain level.
-
Gain Adjustment:
- Increase the gain while maintaining sound dynamics, effectively squashing the track a bit.
-
Utility Volume Control:
- Give a touch of volume boost before reintroducing the limiter to prevent overuse.
Final Check and Export
Let's take a few steps back and listen to the other elements, particularly the strings. I'm confident this mix is good enough for SoundCloud and live play.
Reverb and Effects Monitoring
As we wrap up, it's important to watch for reverb tails and other effects that could extend the track's length:
- Adding Nodes on Master Volume Track:
- Create a fade to ensure smoothness.
Exporting the Mix
Now, we're ready to export the final piece:
-
Go to File:
- Select Export Audio/Video.
-
Bit Depth:
- Change it to 16 bits for CD standard (44.1 kHz).
-
Dithering Process:
- This helps smoothen artifacts when downsizing from higher bit depth to CD standard.
-
Finalizing Export Settings:
- Check "Upload to SoundCloud."
- Name: John Mix
- Save to the correct folder (desktop, in this case).
Ableton will render this mix down into one stereo audio track and upload it to SoundCloud.
For a deeper dive into how I created this track, check out my courses at musicgurus.com. You can also contact me for further feedback on your music or any questions about the courses. Best of luck!
14 lessons
2h 26m of structured video lessons
Advanced video features
Slow down, loop a passage, follow along
Mobile, tablet & desktop
Practise wherever you are
100% satisfaction guarantee
30-day money-back guarantee
Meet your guru
Meet your guru
After work experience with Depeche Mode and The Cure producer Dave Allen, John was inspired to study Music Technology in London. His music career took off after a successful signing to CookShop Records, releasing 9 singles and an album in 2007 that received rave reviews from Q, Uncut and Lowdown Magazine, plus radio play from XFM and Radio One.
John began training as an audio engineer at Bonafide studio in 2005, where he refined his talents, and later that year set up Jackdaw Recordings. He has collaborated with many successful artists, and in 2007 began playing for pop musician Patrick Wolf, performing at leading venues here in the UK and internationally - including The Astoria and Shepherds Bush Empire.
Based in his London studio, John now writes music, with two more releases on CookShop, does sound engineering for prominent artists, and creates sound design for TV ads, film, theatre and corporate video.
That rare mix of songwriter, producer and working studio engineer is exactly what John brings to his teaching. In Creative Composition & Production in Ableton Live and Creative Sampling & Production in Ableton Live, he shows you how he turns raw ideas into finished, release-ready tracks - the writing, the sampling, the sound design and the hands-on engineering know-how behind a professional record.







