



Die Gazell-Methode und die Halbventiltechnik

Mit
PT GazellFüge die Bassdrum auf den Zählzeiten eins und drei hinzu, während du die Hi-Hat gleichmäßig weiterspielst – Sophie lässt die Snare weg, damit du das neue Pattern sicher verinnerlichst.
Das steckt im Kurs
8 Lektionen (1h 11m) · 1 gratis
01. Die Grundlagen überprüfen
20:08
02. Die Gazell-Methode und die Halbventiltechnik
Du bist hier11:51
03. Die 3 Vorteile des Half-Valving
10:58
04. Die Bedeutung präziser Bendings auf den Löchern 2 & 3 beim Ziehen
11:58
05. Übungen für Ziehbendings an den Löchern 2 und 3
2:22
06. Eine Jazz-Blues-Melodie lernen
3:53
07. Über eine Jazz-Blues-Akkordfolge improvisieren
3:28
08. Eine coole Bläserlinie zu dieser Progression hinzufügen
6:48
Transkript der Lektion
Lesson Two: The Gazelle Method and Half Valving
Hi, guys. Welcome to lesson two. This lesson is going to be about the Gazelle method and half valving.
Understanding Half Valving
So let's start with what the term "half valving" really means.
- Let's look at a Richter-tuned diatonic harmonica.
- With the cover plates off, we have:
- A reed plate on the top of the harmonica, which contains the blow notes.
- A reed plate on the bottom, which contains the draw notes.
Here are both of those plates without the comb:
- They sit like this:
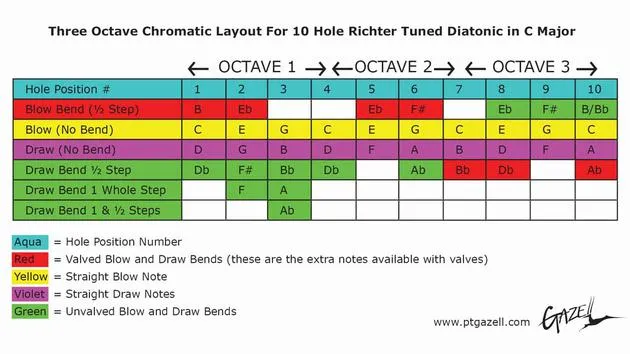
The term "half valving" means that we selectively put a valve over 10 of the possible 20 reed slots. There are 10 blow reeds and 10 draw reeds. As you can see on the blow reed plate, we have put a valve over the top four reed slots. On the draw reed plate, we have put a valve over the first six draw reed slots.
- Six and four is 10, and that's half of 20.
- That's where the term "half valving" comes from.
It doesn't have anything to do with covering half of the reed slot; it means we're putting a valve over 10 out of a possible 20 places we could put a valve on the harmonica.
Bending Notes on the Harmonica
Now, let's not think about valves for a minute and let's just go back and think about when we bend notes.
- On a harmonica, without valves, you're only able to bend draw notes on holes one through six.
Here's why:
- The pattern on a Richter-tuned diatonic harmonica is that the blow note is lower than the draw note.
- Here's blow number one on a Richter-tuned diatonic: that's the note C.
- Now if I draw in on hole one, that's the note D.
In between C and D, there is a half step available: D flat. That's why I'm able to do a draw bend on hole one. The physics of that say both reeds are vibrating, which helps produce the D flat tone on the draw note. We're bending, flatting or bending, the draw note.
Richter tuning at hole seven:
- This is the pattern all the way up through hole six:
- Each time on holes one through six, the blow note is lower than the draw note.
- It's not always a half step, and in some cases, there's no half step, which is why on some holes we can't actually bend down to get a half step interval.
Bending Notes on Holes Two and Three
- On holes two and three:
- With Richter tuning, the interval is big enough on hole two that we can get two semitone bends.
- On hole three, we can actually get three semitone bends because of the way the notes are arranged.
So that's the physics of why we can bend some notes and not others on the first six. Again, think about it in terms of the blow note being lower than the draw note on the first six holes. That's why when we draw bend those first six, if we're able to.
The Pattern Change at Hole Seven
The pattern changes when we get to hole seven on Richter tuning. Now, the draw note is lower than the blow note.
- Here's a simple scale, starting on hole four:
- Blow, draw, blow, draw, blow, draw.
- And then it changes to draw, blow.
Right there, we're going from draw to blow. So keeping that in mind, that's why we're able to do some blow bends at the top of the harmonica.
- Because now we have that interval where we can flat the note going from the blow note down in between that note and the draw note.
- Those are blow notes that I'm bending.
Semitone Bends
Again, the interval between the higher note and the lower note dictates how many semitone bends we can do.
- In the case of hole two, we get two semitone bends.
- In hole three, we're able to get three semitone bends.
These are known as double reed bends because both reeds are vibrating.
Half Valving and Its Magic
Now, here's where the magic happens.
- With the harmonica cover plates off, if I go to hole four, draw, and play that note and bend it, I literally can feel both reeds vibrating while I do that with the cover plates off.
- To produce that note, I'm going to block hole four (the blow note) with my finger, and I'm still going to be able to bend the note.
It changes the tone slightly because both reeds are not vibrating. However, this is a doable thing that can happen, and that's the basis for half valving.
- By shutting off the opposite reed we're trying to manipulate with a valve, we're now able to do single reed bends.
Let's rethink what I said:
- On holes one through six:
- If the interval allows it, you can draw bend a note, but you can't do blow bends because there's no interval to let you do it.
Advantages of Half Valving
If I put a valve on the draw reed slots of holes one through six, I can now do single reed bends of blow notes one through six.
- You can't do that without a valve.
- Now, you could do that by overblowing, but that's a totally different technique.
- We're going to talk about why I think this is an advantage, at least for some players, in a minute.
Where the pattern on the Richter-tuned diatonic changes from blow-draw on holes one through six and then switches to draw-blow on holes seven through ten:
- If we put a valve over the top four blow reed slots, then we can do draw reed bends on holes seven through ten.
That's pretty cool because it opens up a whole other possibility of things you can do on the harmonica.
Important Points to Remember
I think it's important to point out at this point that anything you can currently do on your Richter-tuned 10-hole diatonic, you can still do. The valves just give us some additional options:
- Additional blow bends and draw bends.
- Some emotional content that was not there without the valves.
Remember, a valve is an opening and a closing device. So it opens when you're actually playing that note and closes when you're not playing that note.
Conclusion of Lesson Two
The Gazelle Method half-valved harmonica involves two things:
-
I've developed a valve that I think really works well for diatonics.
- It's very moisture resistant, temperature resistant, and it doesn't buzz or pop or rattle.
- These are issues that plastic wind savers or valves may cause even on a chromatic harmonica.
-
The other thing that the Gazelle Method employs is how the instrument is set up to best accommodate half-valve playing.
- It's much like a guitar player who tweaks his bridge and the fret action and the nut at the top.
- There's a certain gapping of the reeds and shaping of the reeds which I think best accommodates half-valve playing.
To sum up lesson two:
- The way Richter tuning is on a diatonic harmonica means that only some notes without valves are bendable.
- Some of the notes on holes one through six draw are bendable, and some of the notes on holes seven through ten are bendable blow notes.
- By putting a valve over the top four blow reed slots and the first six draw reed slots, we can now do single reed bends in places that you couldn't do bends before.
In the next lesson, we're going to talk about what that means and the advantages of it.
8 Lektionen
1 Std. 11 Min. strukturierte Videolektionen
Erweiterte Videofunktionen
Verlangsamen, Passagen loopen, mitlesen
Handy, Tablet & Desktop
Üben, wo du willst
100 % Zufriedenheitsgarantie
30 Tage Geld-zurück-Garantie
Lern deinen Guru kennen
Lern deinen Guru kennen
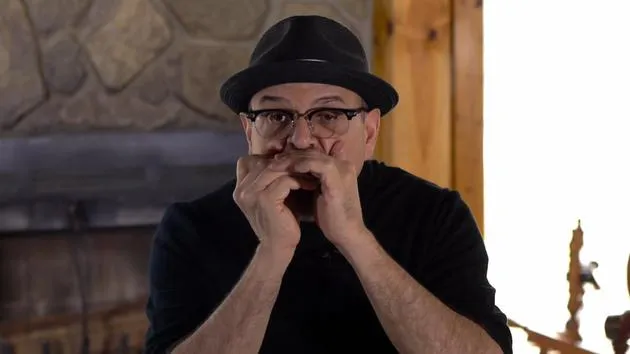
PT Gazell hat sich seine Stellung als Meister der diatonischen Mundharmonika erarbeitet. Nach Jahren als gefragter Begleit- und Studiomusiker für einige der größten Namen Nashvilles entdeckte PT das Half-Valving, und seine Musik erreichte buchstäblich neue Höhen.
Kein anderer Spieler verbindet seine Phrasierung, seinen melodischen Stil, seine Stückauswahl und seine Improvisationsfähigkeiten so wie er - am Ende ist es ein ganz eigener Stil. Mit seinem eigenen Signature-Instrument, der von Seydel gefertigten diatonischen Gazell Method, beweist PT, dass die Mundharmonika zu weit mehr fähig ist, als die meisten von uns glauben.
Genieß es!
In seinen Kursen unterrichtet PT das Half-Valving direkt aus erster Hand, damit du mit der Gazell Method starten, gedämpfte (valved) Bends meistern und sie in deine eigenen Songs einbringen kannst.







