



Comprendre les bends avec valve
Avec
PT Gazell
Le contenu du cours
10 leçons (0h 50min) · 1 gratuites
01. Comment cibler et affiner notre technique de bending
5:35
02. Comprendre les bends avec valve
Tu es ici4:59
03. Un autre exercice de bend en demi-piston
5:09
04. 3 exercices de bending avec pistons
4:45
05. Utiliser des bends avec et sans pistons pour explorer tout l'instrument
3:54
06. Utiliser un valve blow bend dans une mélodie (My Romance)
6:05
07. Exploiter l'émotion supplémentaire qu'offre la méthode Gazell
6:59
08. Le mineur en 5e position comme alternative au mineur en 3e position
5:07
09. Apprends le thème du morceau « Sugar » en 5e position mineure
3:40
10. Apprendre un solo pour « Sugar » et comment jouer le morceau en entier
4:11
Transcription de la leçon
Lesson 2: Getting Our Heads Around Valved Bends
Hi, everybody. Welcome back.
Introduction
This is lesson two, entitled Getting Our Heads Around Valved Bends. I want to start with a simple blow bend exercise at the top of the harmonica that you can do. This will help you get a feel for what I'm looking for when we go to do valve bends.
Blow Bends vs. Valved Bends
To reiterate, valved bends more closely emulate what we do when we perform conventional blow bending at the top of the harmonica. And that's what this exercise is, that's all it does.
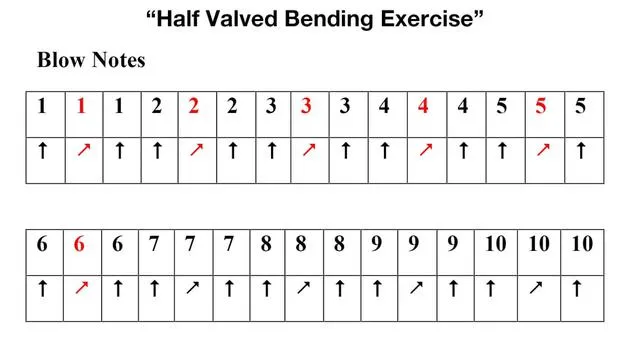
- Look at your PDF. It goes from holes 8, 9, and 10.
- We're warbling back and forth between the unbent note and the bent note.
Listen to how even I'm doing those and how my pitch is so correct. That's what you should be looking to achieve.
Concentration of Air Stream
Now, moving on from there, when we do a blow bend, as we discussed in the last lesson, it requires a very concentrated, very narrow stream of air. This helps us manipulate those little short reeds at the top of the harmonica.
Key Point: Valved bends need that same kind of refined focus because we're only manipulating one reed. We don't have both reeds engaged; it's not a double reed bend. When we use a valved bend, we're only using one reed because we've shut off the other reed with the valve.
Example of Air Stream
Here's another way to think about it, a great example:
- If I hold my hand out this far and open my mouth wide, then blow as hard as I can, I don't feel much air hitting my palm.
- But if I close my mouth down and blow in a more concentrated stream, I feel lots of air there.
That's a great way to think about valved bends in general, as well as conventional blow bends at the top of the harmonica.
Applying Valved Bends
Let's start to think about using valved bends and where they show up on the harmonica. This will help the entire instrument make a little more sense logically.
- All the notes show up in all three octaves, which you didn't have before.
Exercise: Blow Bends
Let's go to holes 8 and 9 and do our blow bends, conventional, non-valve blow bends.
Now, if we simply drop down to holes 5 and 6 and use the valve bend, guess what? It's the same notes an octave lower!
Here's your non-conventional:
- Here are your conventional non-valve blow bends on holes 8 and 9.
Now let's go down and do them on 5 and 6. Guess what? They also show up on hole number 2!
You can get all four of those notes on hole 2 by going from a 2 blow to a 2 blow bend, and then using the draw bend and the regular note on 2 to get those same notes.
Conclusion
As you can see, the whole instrument now starts to make more sense. Even though on a Richter-tuned harmonica, where all three octaves are tuned differently (unlike a piano or a chromatic harmonica), the notes are there.
We can start to use the instrument more fully, in my opinion, because all the notes show up in all three octaves. I think it's very cool.
We'll be back with another lesson shortly.
10 leçons
0h 50m de leçons vidéo structurées
Fonctions vidéo avancées
Ralentissez, bouclez un passage, suivez la partition
Mobile, tablette et ordinateur
Pratiquez où vous voulez
Satisfaction garantie à 100 %
Garantie remboursement 30 jours
Rencontrez votre guru
Rencontrez votre guru
PT Gazell a gagné sa place de maître de l'harmonica diatonique. Après des années comme accompagnateur et musicien de studio très demandé pour certaines des plus grandes pointures de Nashville, PT a découvert le half-valving et sa musique s'est littéralement envolée vers de nouveaux sommets.
Aucun autre instrumentiste ne combine comme lui son phrasé, son style mélodique, ses choix de morceaux et ses capacités d'improvisation : au bout du compte, c'est un style qui n'appartient qu'à lui. À l'aide de son propre instrument signature, l'harmonica diatonique Gazell Method fabriqué par Seydel, PT prouve que l'harmonica est capable de bien plus que ce que la plupart d'entre nous imaginent.
Régale-toi !
Dans ses cours, PT enseigne le half-valving directement à la source, afin que tu puisses débuter avec le Gazell Method, maîtriser les bends valvés et les intégrer à tes propres morceaux.







